Ads

Tuesday, December 15, 2015

Earn Money by Uploading: Make Money online without investment

Earn Money on the Internet - Uploaded.net (Uploaded.to)

Uploaded.net (or Uploaded.to, or ul.to) is a virtual storage place, multimedia platform on the Internet, permitting Users to upload and publish files and content, like videos, images or documents and display them on the Platform. By doing this, you can earn money
Basically, it's pretty simple. You upload interesting content on the platform. Then, you are posting links that lead to your content, to the visited websites, blogs, forums, social networks, etc. Others who like your content, download that content.
Now I will explain in more detail, step by step with pictures, how to do.
Step 1 - Registration
The first thing you need to do, is your registration. Registration is here
At the bottom of the page you will see a blank registration field.


In this field enter your email, then click "register". You will receive this message.
Then go to your email. You got the message to confirm registration. Click on the link in the message.
If you use Gmail email service, there may be a slight delay, be patient, check your inbox later. For this example, I used Yahoo email service.
It will bring you to your profile page on Uploaded.net. You'll see that you get a registration gift worth €2 (EUR).
Look again your email inbox. You'll see that you get message, with your username and password.
Registration is successfully completed!

Step 2 - Uploading

Go to your Profile page. At the top of the page, select upload method and click on it.
Find the content that you want to upload.

Wait until upload is complete.


You have successfully uploaded your content!

Step 3 -  Links

Click "Files & Folders" on top of the page. There is a list of all your files. Select one or more files. You will get options to select a link in multiple formats: without formatting, Html code and BBCode. 
Copy the link and post it where others will be able to see it. When someone download your content, it will increase your download counter.

Step 4 - Affiliate program

There are two affiliate model: Pay per Sale & Pay per Download. For details, see the pictures.
Pay per Download
Limitation: 1 Download is counted per IP within 24h from Guests and Free-Account Users, 1 Download per Account within 24h from Premium-Account users.
Pay per Sale

To activate payments, click "Affiliate program" on top of the page. Then click "Activate payout logbook". 

Once you reach a minimum of €50, you can request a payout. Payouts can be requested via Amazon.com and Amazon.de vouchers, WebMoney and Bank Wire-Transfer. Here are my earnings so far.

Step 5 - Premium Upgrade

Premium users have accounts with extended functions and options in comparison to Free Accounts, fullspeed at download, parallel downloads without restrictions, direct, ad-free downloads without waiting time, unlimited storability of uploaded files, included the complete range of functions plus earning options of the Free Account model. To become a premium user, you can do it here.

This is all you need to know about Uploaded.net. Start earning and Good luck!

Free Download WHMCS v6.0.1 Full nulled

Free Download WHMCS v6.1.1 Full nulled

The Complete automation solution for hosting & domain management, recurring billing & integrated support
WHMCS is an all-in-one client management, billing & support solution for online businesses. Handling everything from signup to termination, WHMCS is a powerful business automation tool that puts you firmly in control.
Demo Link:
http://www.whmcs.com/demo/
Download Links:
http://ul.to/g4hvkvgzhttp://ul.to/g4hvkvgz
http://uploaded.net/file/g4hvkvgz

Sunday, October 18, 2015

Download OsClass 3.0.2

What is OsClass?

Osclass is a opensource classifieds software written in php,mysql.It allows you to start your own
classifieds website in just one minute.Because of , it is a opensorce software, you can change it
as you like and add/remove any extenal link from the software.


Why I use OsClass?

Classifieds is the highest money making way, so OsClass allows you to start your own FREE CLASSIFIEDS Web site in just one minute and You can manage it as your need. It means that you can edit it.

Where is download link?

Here are some download links bellow.
Click on one of the following link and download the OsClass.

Download 1
Download 2

How to Install?

1.Just click on one of the above link and download OsClass.
2.Unzip all the files.
3.Upload all the files on your Web Server by using FTP(File Transfer Protocol)
4.Visit http://{your_website_url}
5.Enter the configuration information.
Enoy!

Flynax 4.3 General nulled - Download Flynax 4.3 General

What is Flynax ?

Flynax is Premium Classifieds Software written in php.You can start your own classifieds website in just few minutes.Classifieds is the highest way to make money online fromm your website.
If you wish to make money online with your own classifieds website so ust click on one of the following link and download flynax software.

How to Download and Install

For downloading Flynax, Just lick on one of the following link and download Flynax.
After downloading Flynax, Upload it on your Web Server using FTP(File Transfer Protocol).
After that, move all the file from `flynax_4.3_general` to your `root` folder (e.g : /public_html).
All done.
Now visit http://{your_website_url}/
Provide your Configuration information and Enoy.

Download Links

Download 1
Download 2

Please Note:
 Flynax 4.3 General is not nulled by us.We have only founder of its download link!

Wednesday, October 14, 2015

Download a file with High Speed - PHP Tutorials

Today I'm going to share a PHP Tutorial.You can download any file with high speed (upto 13MB/sec) even if your internet connect is slow or very slow.
Just create a php file on your server and add this code in your file.

<?php

/**
 * @Project       School Management System
 * @Company       MASGE INC.
 * @Author        Muhammad Athar
 * @Email         masge.info@gmail.com
 * @Copyright     2015
 */


if($_REQUEST['action']=='download' && !empty($_REQUEST['file']))
{
    $filess = explode('/',$_REQUEST['file']);
    foreach($filess as $filee)
    {
        $d = $filee;
    }
   header('Content-Type: application/octet-stream');
   header('Content-Length: ' . filesize($_REQUEST['file']));
   header('Content-Disposition: filename='.$d);
   flush();
    $file = fopen($_REQUEST['file'], "r");

    while (!feof($file)) {

        // send the current file part to the browser
        print fread($file, round(1311 * 100024));

        // flush the content to the browser
        flush();

        // sleep one second
        sleep(1);
    }

    // close file stream
    fclose($file);
   
}


?>

Proof


Sunday, October 11, 2015

Free VPS Servers Windows & Linux no credit card

How about a Free VPS Hosting Server which provides you unlimited disk space, unlimited monthly traffic, Unlimited Bandwidth, Unlimited email accounts, free control panel and No ads. Well, finding such a server is not only hard but next to impossible because there is hosting provider who provides everything unlimited in a free VPS hosting.  Being a VPS expert we worked hard and find out few VPS Hosting providers which offer a free virtual private server hosting with decent server configuration. They might not give you a VPS with everything unlimited for free but the server they will provide you will suffice your basic need. You will also get an option to upgrade your server to a higher configuration by paying a small amount of money.

The free VPS comes with your favorite operating system i.e Windows, CENT OS, Ubuntu, Fedora, Debian etc. You can also get the latest version of your favorite operating system or can choose an older version based on the availability with the VPS Hosting provider.
As you must know that a Virtual Private Server or VPS is basically a Virtual Machine that allows you to run a copy of your own operating system and use 100% of resources without sharing with anyone. The virtual machine allows you to install any software you want and gives you root level access which you otherwise gets with a dedicated server. Virtual hosting offers you all dedicated server alike features with almost 1/4th or even lesser cost.
Popular Operating System Available With Free VPS Hosting
  • Windows 2008
  • Ubuntu 14.04
  • Ubuntu 13.10
  • Ubuntu 12.04
  • Ubuntu 12.10
  • Debian 7
  • Debian 6
  • Fedora 20
  • Fedora 19
  • Fedora 18
  • CentOS 7
  • CentOS 6

#1 Interserver Top Free VPS Hosting Provider

Interserver is one of the most trusted 15 years old web hosting company located in United States and known for it’s quality and affordable web hosting services. Interserver offers a 30 Days free VPS hosting to all of their new customers and renew it at a very cheap price of $6 per month. Interserver offers the widest array of OS with their VPS hosting i.e Windows, CENT OS, Fedora, Debian, Ubuntu etc. So if you want a VPS that comes with a higher up time and human support, we suggest you to give Interserver a try.

 Try IT

#2 Photon VPS Top Free VPS Hosting Provider

Photon VPS is another low cost quality VPS hosting provider. The hosting company doesn’t give you any free VPS hosting but they will charge only $5 per month for the their minimum plan to cover up their running cost. This kind of hosting is always recommended because it comes with certain up time guarantee and customer support.

Try IT

Godaddy $1 Per Month Promotion 2015

Godaddy $1 Economy Hosting Promo 2015

Are you looking for Godaddy $1 Hosting promo?  Or read step by step process below.
Congratulations….. :) 
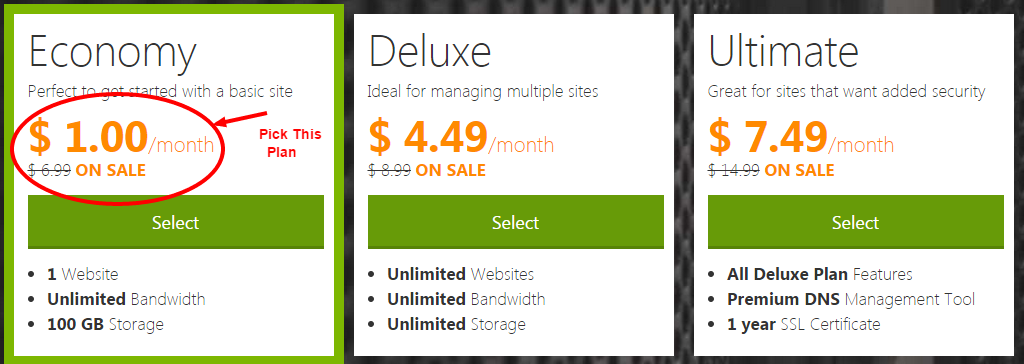
Here is a chance to get Godaddy Economy Hosting at a hefty 86% discount i.e $1 per month (Of course with a Free Domain). Below we’ve mentioned a step by step guide to Buy Godaddy Economy Hosting for just $1 per month. Other plans are also discounted up to 50%.
Note: This is a limited time offer and only applicable to Economy Hosting Plan. You’ve to use the exact step by step process as mentioned below to avail this offer.

How To Avail Godaddy $1 Hosting Offer?

It is pretty easy to avail this offer. Anyone, Godaddy’s new customer or existing customer could buy the hosting services under this offer. You also get a free domain name for 1 year under this offer.
So here are the simple steps….. :)
  1. Must visit Godaddy using the following link.
  2. After you click the above link, it will take you to Godaddy’s web hosting page, where you’ll see a message at the top saying “SPECIAL OFFER! Get 12 months of Economy Web Hosting for just $1*/mo. See the image below.godaddy hosting offer notification
  3. On the same page you’ll see 4 different plans i.e Starter, Economy, Deluxe, Ultimate. You’ve to choose the ECONOMY PLAN only as the deal is applicable only to the ECONOMY PLAN. Don’t bother if you see a higher price mentioned on the page for Economy Hosting as the final discounted price i.e $1 per month will be shown in the shopping cart.godaddy-1-hosting-offer
  4. Once you’ll choose the ECONOMY PLAN after clicking the “Add to Cart” button, it will take you to the next page i.e “Customize your web hosting plan“, where you can choose your preferred operating system out of Windows and Linux. Keep the duration of the plan as 12 months only as the offer is applicable only on first year.choose operating system
  5. Once you’re done selecting your operating system, click on “Continue” button. This action will take you another page i.e “You’re eligible for a FREE domain” . Here you can search and add your free domain to your cart.choose your free domain name
  6. After you finish your search to find a free domain name for you, click on the “Add & Continue” button to visit the payment page. If you need a free domain name, just click on the button ” I Don’t Want My Free Domain“.
  7. Now on the final screen you’ll see your order summary. You’ll see that the total amount to be paid is only $12 and the domain name which you may had added on the previous page is completely free.Godaddy Cart Summary
  8. After you verify your order, click on Proceed to Checkout button & make a payment using your preferred payment mode.

What Comes With Godaddy Economy Hosting Plan?

  • Free Domain Name
  • Choice of Operating System
  • Most Popular Control Panels to manage your hosting i.e cPanel or Plesk
  • 100 GB Web Hosting Space
  • Unlimited Bandwidth
  • 100 free email accounts on your domain name
  • 200+ Free Application with 1 Click Install Option.
  • 45 Days Money Back Commitment
  • 10 GB space for MySQL Databases & 200 MB MS-SQL Database.
  • UpTo 50 FTP Accounts
  • DDoS Protection
  • 24/7 security monitoring
  • 24/7 Customer Support
  • 99.9% up-time guarantee
Don’t wait, Act Now. Offer is for limited period only. Click HERE

Get Free .COM Domain for Life

Free .Com Domain

When someone think of starting up a website, .Com domain is an obvious first choice. The domain was first introduced in 1985. Initially the domain was being administrated by United States Department of Defense but now it is being operated by Verisign, and remains under ultimate jurisdiction of U.S. law. Versign recruit registrars across the globe to offer .Com domain name registration services. Godaddy is one of the top registrar for .Com domain name worldwide. These registrars are required to be accredited by ICANN to be able to offer their domain name registration services. .Com comes under top level domains category and can be used by virtually any commercial or non-commercial website. In December 2011 Verisign has reported that 100 Million domain names were registered. The .Com domain name can be registered by paying a small annual fee and can be registered for maximum 10 years in one go. Although someone can renew the domain name anytime. If someone fails to renew the domain name on time it again become open for registration for general public and anyone in the world can register the domain name. We know that you’ve landed to this article to know about Free .Com Domain and we’ll tell you about some ways to register a Free .Com Domain Name in this article.
There are many advantages to register a .COM Domain Name. Some of the advantages are mentioned below.
  1. Easy To Remember
  2. Affordable
  3. Can be registered easily. No documents required
  4. Best for SEO
  5. Can be registered for up to 10 years in one go

How To Register a Free .COM Domain Name

It is very difficult to get a Free .COM Domain Name but luckily we have found some great ways to register it free. Some of the best working ways are mentioned below in the article. We’ve tested all of the mentioned ways and at the time of writing this article, all of them were working fine. If you found any of this method don’t work for you, just let us know and we’ll try to help you out.

GYBO By Google

Get Your Business Online is one of the most popular initiative of Google to help small businesses in United States to build their online presence. If you live in United States and run a small business, GYBO is the right place to register a Free .Com Domain Name.
All customer who register with GYBO gets a Free .COM Domain Name along with free hosting & a Do-It-Yourself website builder.
Using the free website builder, anyone can build a website. The website builder is so easy and powerful that with the help of it you can yourself build a website in just few clicks. As we mentioned that the hosting service is also provided to you free of cost so you can also save money on hosting services.

Please note that the service is free for only one year and if you find the service satisfactory, you can renew it by paying a small fee to Google. Remember you would require a Google account i.e Gmail Email ID to get register for this offer. If you don’t have a Gmail account, register that first before you sign up with GYBO. To know more about GYBO visit http://www.gybo.com/


Tuesday, September 29, 2015

Microsoft Expression Encoder 4 PRO With Serial Keys

Download Microsoft Expression Encoder 4 PRO Full Version


Microsoft Expression Encoder 4 PRO :  is an advanced audio/video-encoding and live-broadcasting application especially suited for generating content that takes full advantage of the rich graphic and interactive capability of Microsoft Silverlight playback scenarios. You can also generate Windows Media video and audio files that are optimized for other web playback scenarios, or appropriate for playback on portable devices.

How To Crack Or Activate Microsoft Expression Encoder 4 PRO ?

  • Download And Install Expression Encoder 4 PRO Setup From Below.
  • Use Below Provided Serial Product Key From Below To Register Microsoft Expression Encoder 4
  • That’s it,Enjoy Microsoft Expression Encoder 4 PRO Full Version 😉
Microsoft Expression Encoder 4 PRO Serial Key  : 6WDDQ-K7D4F-GQGF4-2VYBJ-8K6MB

Microsoft Expression Encoder 4 Setup Download Links!


ESET Products Any Version Lifetime Universal Activator


ESET Products Any Version Universal Licence Finder & Installer


ESET Any Version Universal Lifetime Activator : a program that every system startup or at the request of the user dives into the Internet and looking for valid & fresh licence keys for Eset Nod32 Smart Security and Eset nod32 Antivirus for all versions 2.5.x, 2.7.x, 3.x, 4.0. x, 4.2.x, 5.0.x, 5.2.x, 6.0.x, 7.x Beta, and automatically inserts them.

How to Activate Eset NOD 32 For Lifetime ?

  • Install Any Eset Product.
  • (Really Important) Disable All Features Of Eset Like Real Time protection, Web Access Protection, Hips, etc
  • Now Run TNODUP-Portable.exe
  • It will launch TNod username & password finder.Just wait about 20 seconds
  • The crack will do all the steps for you !
  • Now open ESET NOD32 Antivirus and check activation status
  • Yaay ! Activated 😀
  • Run the TNODUP-Portable.exe again when ESET NOD32 Antivirus expires 😉
  • Turn On Disabled Features in Step 2 In You Want 😉
Make a Comment Below For Help i Am Always Here For You! 😉
Important Notes :
This crack is not developed by Us, we just modified it with some bug fixes.
You must disable all the virus guards including eset before downloading the crack.And please don’t be silly around here commenting the activator contains virus.We cannot help newbies who think cracks are virus.

 
 Download Crack

Monday, September 28, 2015

How to Register Havij?

Registering Havij

Before you can register the software you should buy a license. For purchase detail contact info@itsecteam.com
After receiving the license follow these steps to register.
  1. Connect to the internet
  2. In about window click on Register


  1. In Name text box enter the name that your license is registered to.
  2. In File text box browse the license file.

Important: both name and license file will be send to you after purchase.
  1. Now click on Register and wait until license validation process completes. The following message should be shown if everything is correct.


Important: if you use firewall, make sure that Havij has enough permission to access the internet. If you had problem with registering, turn off your firewall and repeat all steps.
Important: using one license at two or more different machines will make the license expired!
     

How to use Responder in SMSCaster?

RESPONDER

The  Responder  is  used  to  reply  to  the  sender  of  an  incoming  SMS
automatically. This is done based on pre-set keywords and reply messages. You
may store the keywords either in a project file or in an external text file.
1.  Store the keywords in a project file
By  default,  when  you  add  keywords  and  reply  messages  from  the  user
interface, they are stored in a project file. This means that they are saved together
with the Inbox, Outbox and Sent Box. This allows you to have different set of
keywords and reply messages with different project files.

2.  Store the keywords in an external file
To  enable  an  external  keywords  file,  specify  the  file  location  at  Tool-
>Options->Responder. It is a text file, encoded in ANSI, UNICODE, UNICODE (Big
Endian) or UTF8 with the BOM mark. There is no user interface within SMSCaster
to edit the keywords stored in an external file. The simplest way to create one is by
using Notepad. Another way is to prepare the data in Excel and “Save As” a CSV file.
It can be considered as an interface to control the Responder: by producing
the keywords text file from another program, you can automate the Responder.
The file will be checked periodically for any changes and will be reloaded when
necessary.
External keywords file is available to all projects and considered as global.
Keywords are case insensitive. If the same keyword appears both in the project file
and in the external file, the one in the project file will be used.
For the file format, each line contains a keyword and reply message pair, for
example:
        Health, "Thank you for your inquiry..."
        Win, "Please call +923039470421 for your chance to win"
        *, "Sorry, we do not have the information you want"
The  asterisk  means  matching  anything  and  serves  as  the  default  reply
message when no keyword is matched. It should be put at the last line of the file orit will override other keywords below it.
You may also put several keywords for the same reply message in one
for example:
         Diet, Food, "Please call +923039470421 for info on food and diet"

3.  Enable and disable the Responder
Click the "Enable" button on the toolbar of the Responder Page to enable the
Responder. It does not work until the "Start" button is pressed. See “Persistent
Connection” if you need continuous auto-respond.
4.  Send long and flash reply message
You may reply in long SMS or flash SMS (but not both). Go to Tool->Options-
>Responder for these settings.
5.  Blacklist File
A blacklist file contains blocked phone numbers which you do not want to
reply to. It is recommended that you enter the phone number of your SIM card into
the blacklist to avoid potential infinity reply-to loop. It is a plain text file with each
phone number on a new line.
6.  Log File
This is to log successfully replied phone numbers to a file for reference.
7.  Others
Persistent Connection
If you want the Responder to work continuously, you should set "Persistent
Connection" at Tool->Options->Connection Tab. It will wait for incoming SMS and
reply automatically until the "Stop" button is pressed.
Delete Received Message from Phone
To avoid responding to incoming SMS saved at the phone again and again
when you re-start SMSCaster, you should enable "Delete received message from
Phone" at Tool->Options->Receive Tab.

SMSCaster - SMS Command Line Interface for Developers

SMSCaster Command Line Interface v0.4

Commnad line options for SMSCaster E-Marketer

Syntax:
  smscaster.exe [Project File] [-Option1 <arg1> <arg2> ...] [-Option2 <arg1> <arg2> ...] ...
 
Description:
  All options begin with '/' or '-'. They are case insensitive.

Available Command Line Options
  -Compose
  -ImportOutbox <filename> 
  -Queue <N>
  -Start
  -Stop
  -Long
  -Flash
  -ForceUCS2
  -NoSplash
  -NoRestore

[Project File]
  Meaning: The project file to be opened.
  Example: smscaster.exe "c:\My Project.sms"
  Remark: Filename must come first if any.

-Compose <PhoneNum>|<PhoneListFile> <Message>|<Message File>
  Meaning: Compose new SMS to the outbox.
       
  Example 1. Send to a particular phone number. SMS is sent immediately
    smscaster.exe -Compose +85291268167 "Hello World." -Start
   
  Example 2. Send to a particular phone number. SMS is stored in the outbox.
    smscaster.exe -Compose +85291268167 "Hello World."   
  
  Example 3. Send to a list of phone numbers stored in a text file.
    smscaster.exe -Compose c:\PhoneNum.txt "Hello World."
 
  Example 4. Send to a particular phone number with content stored in a text file.
    smscaster.exe -Compose +85291268167 c:\content.txt
   
  Example 5. Send to a list of phone numbers with content stored in a text file.   
    smscaster.exe -Compose c:\PhoneNum.txt c:\content.txt
 
  Remark:
    <Message> argument - If message content is passed directly in the argument, these characters need to be encoded:
      "   Double Quote    -> %22
      LF  Line Feed       -> %0A
      CR  Carriage Return -> %0D
   
    <PhoneListFile> contains list of phone numbers, which are separated by comma or start on a new line.
   
-ImportOutbox <filename> 
  Meaning: Import from a CSV file into the outbox
  Example: smscaster.exe -ImportOutbox c:\outbox.csv
  Remark: There are two columns in the CSV file. First is for phone number and second is for message content. 
 
-Queue <N>
  Meaning: Specify which queue to go, where N is from 0-5. Works with -Compose and -ImportOutbox option.
 
  Example 1. Compose a single SMS and put it into queue 1.
    smscaster.exe -Compose +85291268167 "Hello World." -Queue 1
   
  Example 2. Import from a CSV file into the outbox and specify which queue to go.
    smscaster.exe -ImportOutbox C:\Outbox.csv -Queue 2
   
  Remarks: This is for the Enterprise Edition only. 

-Start
  Meaning: Start sending sms in the outbox and receiving.
  Example: smscaster.exe -Start
  Remark: To start automatically, you must have the COM port selected properly before automation.
 
-Stop
  Meaning: Stop sending and receiving.
  Example: smscaster.exe -Stop
 
-Long
  Meaning: This is a long SMS. Must be used with -Compose option to be meaningful.
  Example: smscaster.exe -Compose +85291268167 "Very long sms here..." -Long
 
-Flash
  Meaning: This is a flash SMS. Must be used with -Compose option to be meaningful. 
  Example: smscaster.exe -Compose +85291268167 "Hello World." -Flash 
 
-ForceUCS2
  Meaning: This SMS is encoded using UCS2. Must be used with -Compose option to be meaningful.   
  Example: smscaster.exe -Compose +85291268167 "Hello World." -ForceUCS2
 
-NoSplash
  Meaning: Do not display the splash screen. Applicable only when the program is started at the first time.
  Example: smscaster.exe -NoSplash
 
-NoRestore
  Meaning: Do not bring up and restore the existing window. Applicable only when the program is already started and running.
  Example: smscaster.exe -NoRestore

Friday, August 21, 2015

9th Class Result 2015 Bise Gujranwala


Please use the following form to check your 9th class result.

SEARCH  BY ROLLNO


Enter Roll No


Saturday, August 1, 2015

How to Add your site in google index?

Hello friends!
Now I'll share a trick to Add your site in google index easily.
You can add your website in google index without creating a Google Webmaster's account.
You can submit your website in google index easily.
Just goto the following link and type your URL in the box and Type Captcha code correctly.
Link : Click Here

Serve a file using php with high speed.

Learn How to serve a file using php with high speed?
Create a page download.php
 

  <?php
/**
  * @Project PKSkiET
  * @Company SkiET INC.
  * @Author Muhammad Athar
  * @Email masge.info@gmail.com
  * @Copyright 2015 */
  if($_REQUEST['action']=='download' && !empty($_REQUEST['file']))
  {
    $filess = explode('/',$_REQUEST['file']);
   foreach($filess as $filee) { $d = $filee;
    } header('Content-Type: application/octet-stream');
     header('Content-Length: ' . filesize($_REQUEST['file']));
      header('Content-Disposition: filename='.$d);
       flush(); $file = fopen($_REQUEST['file'], "r");
        while (!feof($file)) {
            // send the current file part to the browser print
            fread($file, round(1311 * 100024));
             // flush the content to the browser
             flush();
              // sleep one second
              sleep(1);
               }
               // close file stream
                fclose($file);
                 } ?>

Now open http://server/download.php?action=download&file=[your file located on your server]

How to Install VestaCP on VPS?

HI!
Today I'm going to share a trick for VPS.
Learn : How to install VestaCP on Centos,Debian,Ubuntu etc.
VestaCP is simple Web Hosting Control Panel which allows you to manage your website easily.
You can install it by using the following commands.

 $   wget http://vestacp.com/pub/vst-install.sh   
 $    vst-install.sh                                                 

After staring the setup, follow the instructions on the screen.

How to Unblock youtube in pakistan without any software?

Hello Friends!
Today, I'm going to share an awesome trick to unblock youtube in Pakistan.
Now you can unblock youtube in Pakistan without any software.
Its very easy to unblock youtube for your pc.You need not any VPN or Software to unblock youtube in Pakistan.Youtube has blocked in many islamic countries but you can unblock it by using the method bellow.
Please follow these steps to unblock youtube.

Step 1
Open the Notepad by going to Start Button >> Run and type notepad and press Enter
Step 2 Now open the following file into the notepad for editing.
%SystemRoot%\System32\drivers\etc\hosts

Step 3 Add the following lines at the end of the file

94.75.199.172     adserver.kimia.es
74.125.136.95     ajax.googleapis.com
94.31.29.154      netdna.bootstrapcdn.com
74.125.136.102    support.google.com
74.125.136.94     fonts.gstatic.com
74.125.136.113    apis.google.com
74.125.136.93     youtube.com 
74.125.136.132    yt3.ggpht.com 
74.125.136.84     accounts.google.com 
74.125.136.100    play.google.com 
74.125.136.139    i.ytimg.com 
74.125.136.138    plus.google.com 
74.125.136.115    checkout.google.com
193.104.215.66    get.adobe.com 
74.125.136.91     www.youtube.com 
74.125.136.84     accounts.youtube.com 
74.125.136.148    ad.doubleclick.net 
74.125.136.154    pagead2.googlesyndication.com 
74.125.136.94     www.google.nl 
74.125.136.100    m.youtube.com 
74.125.136.113    s.ytimg.com


Step 4
Save the file by pressing CTRL+S
Step 5 Goto the browser and type https://youtube.com/

10th Class Result 2015 - Bisegrw

The result of 10th class bise gujranwala has been announced.
Please enter the roll no. in the form below to check your result.

9th class result 2015 - Bisegrw

The result of Secondary School Certificate Part-I (Annual) Examination, 2015 will be declared on 21st of August, 2015.
Learn more 

Thursday, July 16, 2015

How to Change Your Password without entering old password?

Hello Friends!
Aj main ap ko btaon ga k Ap apne Computer ka password kesay change kr skte hain wo b old password k bgair.
Just follow these steps to change your password.
Step 1 : Open Command Prompet by going to Start >> Run and Type cmd


Step 2 :
Use this Command
$ net user [username] [new_password]

E.G : net user Administrator my_new_password


Type the above command and press ENTER Key.
 Congratulations! You have successfuly changed your Password. 


Wednesday, July 15, 2015

Start your own URL Shortening Service

Hello Friends!
Today I'm going to tell you about URL Shortening Service.
If You want to Start Your Own URL Shortening Service, Download the following Scripts
Written in PHP,MySQL.

1 : ALW URL Shortener
 ALW URL Shortener is an open source php script which allows you to shorten your long URL into a small url with only one click.
You can make a custom url while shortening your URL.
AlW URL Shortener is free for use.It refers you to your long url fasly because it does not show ads on the refer page.
Download Link :

DOWNLOAD


Password is : sky

How to install Roundcube on VPS?

Hello friends!
To install roundcube on VPS, Please follow these steps...
Step 1 : Download Roundcube

$ wget http://sourceforge.net/projects/roundcubemail/files/roundcubemail/1.0.3/roundcubemail-1.0.3.tar.gz

Step 2 Extract Roundcbe Archive

$ tar -zxvf roundcubemail-1.0.3.tar.gz

Step 3 Rename the Folder Name

$ mv roundcubemail-1.0.3.tar.gz mail

Step 4 Now move mail directory to you public_html
/var/www/html/ is default directory in Centos

$ mv mail /var/www/html/

Step 5
Open Your browser and goto your IP address and Install Roundcube.

How to install Xampp on Centos?

Hello Friends!
In this post, I'm going to describe How to Install XAMPP on Centos?
Follow these steps...
Step 1 :
Download Xampp for Linux

$ wget http://downloads.sourceforge.net/project/xampp/XAMPP%20Linux/1.8.1/xampp-linux-1.8.1.tar.gz -O xampp-linux-1.8.1.tar.gz

Step 2 :
Make Directory named opt.

$ mkdir /opt

Step 3 :
Extract the archive.

$ tar -zxvf xampp-linux-1.8.1.tar.gz -C /opt/

Start Xampp Services

$ /opt/lampp/lampp start

Note : Please Stop Apache,MySQL and FTP Services before starting Xampp!

Tuesday, July 14, 2015

How to Install and configure Vsftpd on Centos

Hello friends!
In this post, I'm going to describe How to Install and Configure vsftpd on centos?.
Vsftpd is a FTP Server which allows you to manage your server files remotely.
Please Use the following commands to install vsftpd on centos.
Step 1 :
 

$ yum -y install vsftpd nano

Step 2 :
Edit the vsftpd configuration file

$ nano /etc/vsftpd/vsftpd.conf

Now edit line as

anonymous=NO
ascii_upload_enable=YES
ascii_download_enable=YES
chroot_local_user=YES
chroot_list_enable=YES
chroot_list_file=/etc/vsftpd/chroot_list
ls_recurse_enable=YES
#Now add this line
local_root=/var/www/html

Step 3 :

$ echo "admin" >> /etc/vsftpd/chroot_list

Replace admin with your username.
Step 4 :

$ service vsftpd start
$ chkconfig vsftpd on

Congratulations! VSFTPS Server has been successfuly installed on your Centos.